Independent decoration of your home is a matter of honor for craftsmen and craftswomen who prefer an original and unique interior. Modern trends in the decoration of premises dictate the use of relatively modest and concise objects.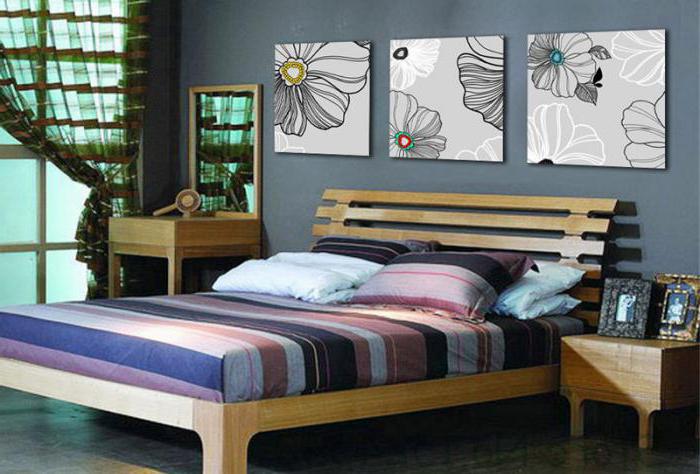
Do-it-yourself modular paintings are just such minimalistic types of jewelry. Their simple geometric shape, the absence of frames, glass and other unnecessary details, allows you to create them yourself.
What are modular paintings?
As the name implies, these decorative elements consist of several separate parts (modules), which are united by a common artistic idea and are placed on the wall in a specific order.
As a rule, do-it-yourself modular paintings from murals or other materials, like factory products, have a certain thickness. That is, they form a bulk composition. The depth of individual modules can be the same (most often) or different. In the second case, the difference in volume allows you to create the effect of a three-dimensional image.
Do-it-yourself modular paintings: views
As the main material for creating such a decor, you can use:
- wallpaper (ordinary or photo wallpaper);
- Photo;
- colored paper;
- the cloth;
- canvas.
Truly original are products drawn by hand on paper or canvas. However, the simplicity of manufacturing modular paintings opens up wide possibilities even for those who are far from the world of creativity. When using ready-made colored materials, the main necessary skill can be called the accuracy of a home master.
The arrangement of elements can be linear, diagonal or abstract. The modules are given a completely different form: square, round, arbitrary. True, the most simple for manufacturing a house still remains rectangular.
How to place finished products
Thinking about how to make a modular picture with your own hands, you should think about its placement in advance. As a rule, empty sections of walls above sofas, along stairs or between doorways need decoration and filling.
The diagram below offers various options for the arrangement of elements of modular paintings, which will also be useful to those who plan to post a large number of photos or panels.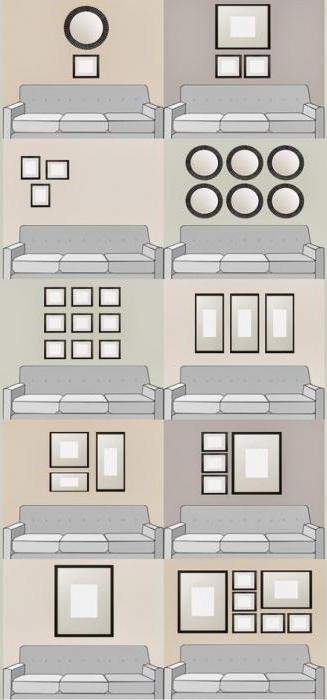
Paintings on canvas
Do-it-yourself modular paintings created as an alternative to the original paintings imply the use of high-quality materials and specific technology. The basis for applying the decorative layer is canvas.
In the shops for artists, a wide selection of various blanks is presented, including a durable wooden subframe with a canvas stretched over it. The assortment of such stores often depends on the demand for such products, so finding materials in provincial cities can be problematic. The way out is the search and purchase of everything you need in online stores.
The selected drawing is applied to the finished base in any available technique (oil, pastel). Such modular paintings, made with their own hands, are a real work of art.
In the event that the image cannot be drawn, it can be applied to the canvas using a special printer. To accomplish this task, a finished base with a subframe will not work. You will need to purchase a separate canvas and mount for it.Printing on canvas is a fairly common service that many printing houses offer.
An important point: before you make a modular picture with your own hands, you should carefully plan the location and boundaries of each of its elements. The canvas with the printed pattern should be stretched on a stretcher, which means that each element of the composition needs to be printed separately with a sufficient supply of clean canvas at the edges.
Using materials at hand
Unlike the previous method, do-it-yourself modular paintings from wallpaper are much easier to make. As a decorative material, you can use any wallpaper you like, a picture printed in a print shop, family photos, portraits of your favorite movie artists or decoupage cards.
For such paintings, you also need a stretcher with particleboard or plywood. You can buy it or make it yourself. The color image is drawn, cut out and attached to the flat base of the subframe. For fixing, use special glue, double-sided tape or a construction stapler. The disadvantage of using liquid glue is softening and deformation of the paper, so you should experiment on an unnecessary fragment in advance and choose the right material.
Before you make a modular picture with your own hands from a photo wallpaper, you need to make sure that the finished elements are correctly aligned on the wall and create a single story. Therefore, the cutting of wallpaper should be carried out taking into account allowances for hem. An alternative could be pasting the end of the subframe with another material. In this case, the area of the picture coincides with the surface area of the subframe.
Do-it-yourself modular painting: master class
Quite a popular material for the manufacture of modular paintings is fabric.  Its color can be any, at the discretion of the owner of the house. To work, you need such tools and materials:
- stretcher;
- decorative fabric;
- scissors;
- meter or tape measure;
- glue or construction stapler;
- additional elements (fasteners for hanging, tape for processing the butt, decor).
For fabric cutting, it is better to make a pattern according to the size of each fragment. Parts with hem allowances should be cut carefully, especially when it comes to material with a geometric pattern. If you allow a skew, it will be very noticeable, you have to redo it.
The beauty of using fabric is that you don’t have to try to match the edges of a future modular picture. This greatly simplifies the work.
The subframe may be wooden or foam. When choosing the second option, it is worth abandoning the use of glue, since it will be almost impossible to achieve uniform sizing of the fabric.
Work sequence
Cut out fragments are placed on the surface of the subframe and fixed with temporary fasteners at several points (pins or thin nails). Then the workpiece should be turned over, stocks on the wrong side and sequentially attached to the subframe. You should start from the long sides, then go to the short ones. The last to add and fix the corners.
It is necessary to avoid excessive stretching of the canvas, as this will lead to deformation of the pattern. If desired, the ends can be processed with a tape, and decorative elements can be attached to the front surface of the picture.
Last of all, loops are beaten from the inside and then pictures are hung on the wall.